
Using a Dremel to mod your case
For Christmas this year, I received a new power supply for my HTPC. But lo and behold, when I opened up my PC to swap power supplies, it didn’t fit. What was I to do? I could have returned the perfectly good power supply and swapped it for a different model which would fit…or I could go to the hardware store, buy some power tools and take care of the situation. Clearly, the second choice was the way to go.
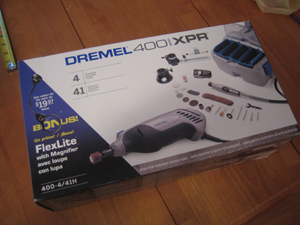
My trip to the hardware store was uneventful and I came home with a brand new Dremel 400 XPR 4/41 (4 attachments & 41 accessories). It was $79.95 plus tax. There were less expensive packages, but this one included the Flex Shaft. The Flex Shaft allows you to work in tighter spaces and hold the grinding/cutting tool of your choice like a pen.
Digg it if you enjoyed this article:
|
|

|
| My brand new Dremel | Stock photo of everything included |
Getting Started
Getting Started
Now I’m going to walk step-by-step through the basics of modding your case with a Dremel. I had never used one before but within a few minutes of looking at the instructions I had the Flex Shaft attached and was ready to go. So here’s a photo guide to cutting up your case.
SAFETY PRECAUTIONS
While working with the Dremel the company recommends wearing both eye protection (flying broken blades) and respiratory protection (metal dust everywhere). I’ll admit I didn’t wear respiratory protection, but I did wear goggles, gloves, long sleeves and long pants.
Also, there are vents on the Dremel. Don’t block them with your hand while holding it. The motor needs air flow to keep cool. Using the Flex Shaft you can put the Dremel down or just hold it lightly in your off hand.
The rotor also would occasionally release sparks when working with the metal case. I'd suggest not standing next to an open can of paint thinner while working with it.

|

|
| First, remove everything from your case. | Here’s the offending power supply tray. |

|

|
| My shiny new power supply, which definitely doesn’t fit. | Measure carefully and mark your cuts with a pencil |

|

|
| The Flex Shaft makes it much easier to get into small spaces and work inside the case. | I used a standard #420 cutting blade. For heavy work consider a reinforced blade. |
Now that you have everything assembled, your cuts marked out and your saftey goggles on, let's get to work!
Cutting Your Case
Cutting Your Case
When working with the Dremel, hold the Flex Shaft in your pen hand. Use a high setting for the rotation speed while cutting. Gently press the blade where you are looking to make your first cut. I made all my cuts just a little bit inside my pencil marks. When making long straight cuts, I cut through the metal and then worked the blade sideways in the groove. This created a fairly straight line off of the initial cut. Just gently apply sideways pressure to the edge of the cut and keep grinding to the left and right. However, if your initial cut isn't perfectly along the line you are making you'll need to make multiple small cuts side by side and then grind it smooth later.

|

|
| My first cut. Gently apply pressure in one spot until the blade sinks through the metal. Let the rotating blade do the work and DON’T force it. Then work to each side. | Continued my cutting. If the blade stops spinning, back off from the cut or turn the Dremel off. The blades can snap and fly everywhere. I broke 3 blades on this little project. Good thing they’re cheap. |
 |

|
| Next I flipped the case over and attacked from the bottom. It was easier to work on an exposed corner edge than a recessed interior edge. | Over time the blades will wear down. In this instance I managed to actually wear a blade all the way down without breaking it into a million pieces. Some people recommend keeping your small blades and saving them for detail work. |

|

|
| Success! The PSU tray now should have the space to accomadate my larger power supply. | Don't forget to blow all those metal shavings and metal dust out of the case. You don't want any of it getting into your pc components. |

|

|
| After cutting the edges look pretty ugly, have numerous metal burrs and splinters and are quite sharp. We'll take care of this in a little bit. | Uh oh…what's this. The PSU fits, but the case is putting a lot of pressure on the attached cables which extrude from the bottom of the power supply. |
Grinding and Finishing
Grinding can be a time consuming task, but it is also an opportunity for you to create flawless lines and perfectly smooth surfaces. Your end product will be as good as the amount of time you spend grinding and requires patience more than skill. There are a multitude of grinders and smoothers you can use. I used the one shown below for all my grinding. It was easy to work the point into corners, but for the long edges a barrel grinder probably would have been more efficient.

|

|
| First thing first…free up some space for those power cables. | I used the angled grinding tool figuring it would allow me to work both large edges and small spaces like corners. |

|

|
| The grinding tool is easy and efficient and cleans those edges right up. You'll notice I was too lazy to grind everything down to a perfectly straight line. With just a little more time and effort you can make your edges straight and your circles round. | Perfect!!! |
I hope I was able to shed a little light on the art of Dremeling and that I was able to convince you that anyone could do it. It took me about an hour and a half to cut and grind the bay for my power supply and I had never used a dremel before. Good luck and happy modding!