
Migrate Away from Windows Home Server Drive Extender
As previously noted, I’m working on upgrading the server in my house, which currently runs Windows Home Server (v1). While I don’t plan to use Windows Home Server 2011 for anything but backups, this guide should assist others who are thinking about how to upgrade WHS to WHS 2011, particularly migrating all your data out of the drive pool. This process will also work if you intend to move to any alternative “drive pool” solutions, such as FlexRAID, unRAID, FreeNAS, or the couple of 3rd party add-ins for WHS 2011. To prepare for the move away from the WHS Drive Extender (DE) technology, since it was so unceremoniously ripped out of WHS 2011, the very first step I needed to take was to discontinue the use of DE for, at least, SageTV. The rest of the data, such as music, photos, and other documents take up but a fraction of the space, so the bulk of the work will be getting all my SageTV recordings and ripped videos out of DE and into individual folders/drives.
Due to how DE works, the removal of a drive from WHS v1 (from this point forward, I’ll simply refer to it as WHS) can take a very long time, depending on the amount of data being removed, as well as the drive’s speed. I would recommend planning to do only one or two drives per day–in order to minimize downtime–and expect nothing to be able to access the drive pool during removal. This means SageTV will not be able to record additional TV to the pool, which is actually a good thing, considering the goal here is to stop everything from utilizing the drive pool entirely. Once the drives are removed, we’ll create some shares for the individual drives, set permissions, and get back to recording!
Let’s get started…
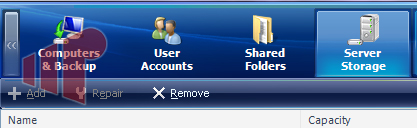
To begin, RDP (remote desktop) into WHS and shut down any services or add-ins which might access the shares. In my case, the only thing I needed to shut down was the SageTV service. Thankfully, there’s no need to remove all your drives at once, so there need not be a lengthy outage for SageTV or your server. Go ahead and open up the WHS Console and do that. Once it’s stopped, go over and select “Server Storage”. Highlight the drive you want to remove and click on “Remove”.
At this point, WHS will verify whether or not you have enough remaining space in the pool to move all the data. If not, I would suggest the following:
Look at the free space you currently have in the drive pool, and subtract that from the amount of space on your smallest drive in the pool. That’s the size of the drive you need to add to your server OUTSIDE of the drive pool. So, if you have 500GB free on the server and are trying to remove a 1TB drive from the pool, you’ll need to add at least a 500GB drive to your server, outside the pool (1000-500=500). Because of the amount of data we’re moving, and the possibility for problems, I would suggest installing something like TeraCopy (free for home use) to assist you with this next step. You may even want to use the verify function of Teracopy in order to ensure the data was moved over successfully. Go ahead and begin Teramoving your files from the WHS shares to the non-pooled drive until it’s full. This will probably be a good time to find something else to do.
Done already? Great! Now, try removing the drive from the pool again. It should work.
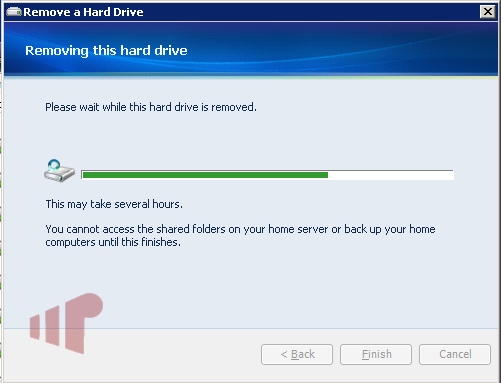
Once you see this screen, guess what time it is? Time to find something else to do. This will probably take a while.
Now that the drive has been successfully removed, we need to make it accessible as a network share. What we’re going to do now is create an empty folder where we can mount the drive, which will essentially map the drive to this folder’s location. The first thought you have might be to create these folders on your D: drive, since that has more space than the precious C: drive of WHS, which has but 20GB of space dedicated to it by default. The issue with this is that WHS expects all shares on the D: drive to be part of the drive pool and will generate tons of error files in your “C:\Documents and Settings\All Users\Application Data\Microsoft\Windows Home Server\logs” folder named similar to “DEUtil.112511.110000.4952.log”. Inside these files will be entries like the following:
[11/25/2011 10:06:50 AM 139c] ERROR WITH: D:\7_2_0\DE\folders\{00008086-058D-4C89-AB57-A7F909A47AB4}\Index.4096.dat because file is not migrated when it should be
You will get an error like this for every single file it finds in the mounted share. From experience, I can tell you that these log files get huge (hundreds of megs in size!) and will clog up your puny C: drive in no time at all. I fought with this for months before I realized what the issue was. Therefore…
Open up your C: drive, create a folder called “Shares” (or skip this step, if you want the folder shares at the root of your C: drive), and then create a sub-folder there with a naming scheme that works for you. You might want to name them something more descriptive about the data they contain, but I don’t. I used to do this, but, as my library grew, MUSIC1, MUSIC2, MUSIC3, and MUSIC4 didn’t help me know WHAT music was on each drive. Additionally, MUSIC (A-G), MUSIC (H-L), wound up being too difficult to manage, since one grouping of music would fill up quicker than others and it created the need to move things around far too frequently. Besides, Windows has really done a great job of minimizing the need to know exactly where all your files are physically located. Because of the number of drives in my server, I went with numbers representing each drive’s physical location in the case.
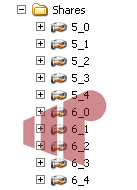
Then, I created the same group of folders on every share, such as DVR, PHOTOS, MUSIC, VIDEOS. This way, everything can be on every drive. Obviously, it’s up to you.
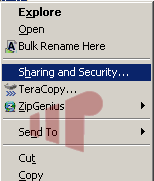
The next thing we need to do is deal with permissions, so that the files will be accessible from any computer on your network. Right-click on the top-level folder you created (i.e. 5_0, 5_1, 6_0, in my examples) and select “Sharing and Security”:
Select “Share this folder”:
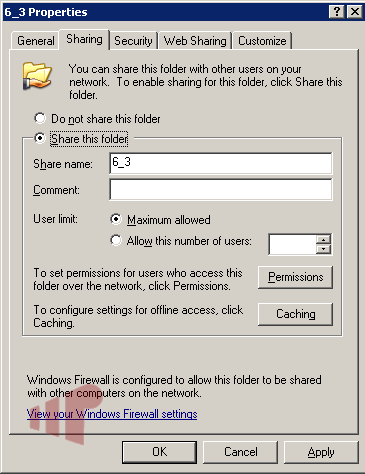
Feel free to change the share name, but the default will probably work. Click on “Permissions”:
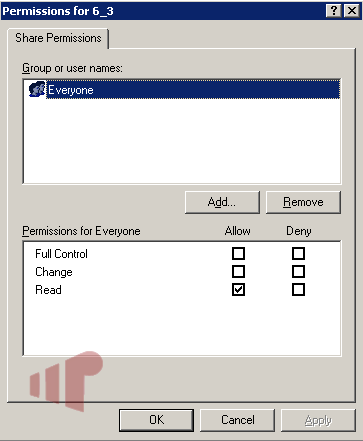
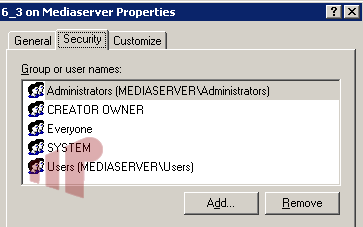
If you do NOT want everyone to have simple READ access, go ahead and remove that group. This is something to consider for any financial or other personal documents/files you might store on your dedicated server. You might not want the wife or kids seeing that (ahem) private collection of videos you have.
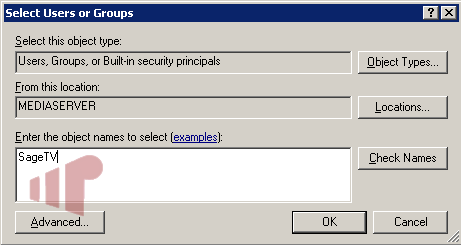
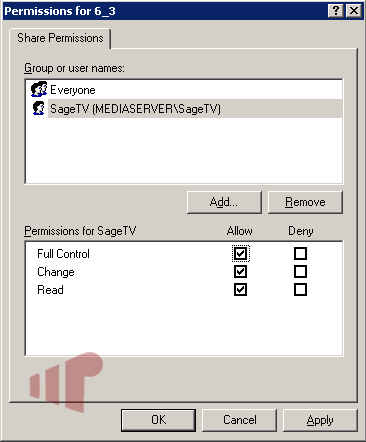
If you have SageTV running as a service, it should be set up to use an actual user account with admin rights. That’s beyond the scope of this guide, but it’s required in order for SageTV to access your network shares. For me, I previously created the quite appropriately named “SageTV” user account. Click on “Add”, type the name of that admin account in, and hit “OK”.
Grant the account “Full Control”:
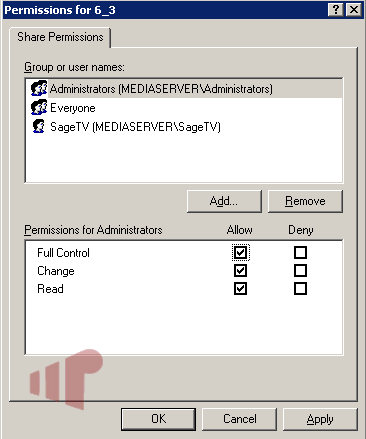
Repeat that process for “Administrators”, as well. Otherwise, I wouldn’t be able to access the folder anymore, unless I logged in as “SageTV”. If you have any other accounts needing access to the share, repeat the process and click “Apply” when you’re done.
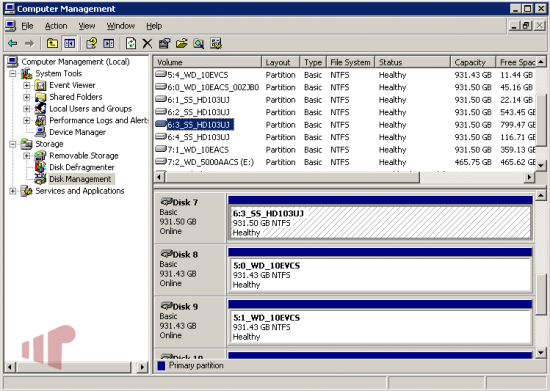
Open “Computer Management” (Start -> Control Panel -> Administrative Tools OR Start -> Run -> compmgmt.msc). Navigate to “Disk Management” and select the drive you removed from the pool.
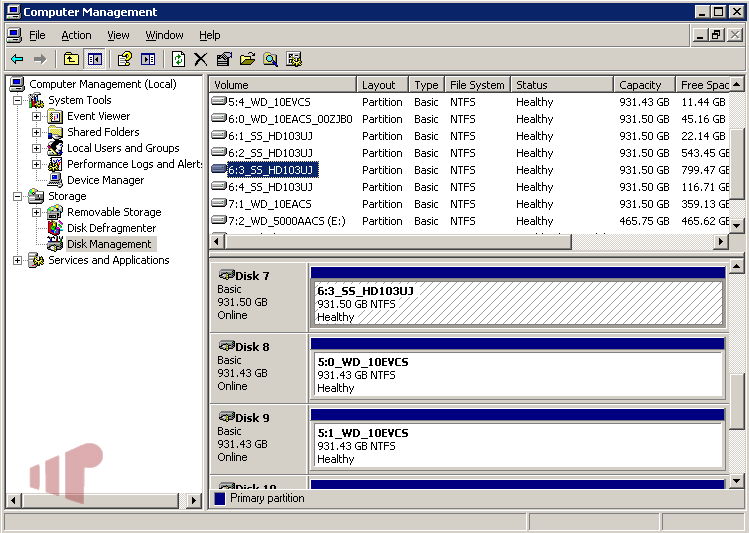
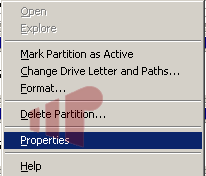
Right-click the partition (where the drive shows the word “Healthy”) and select “Properties”.
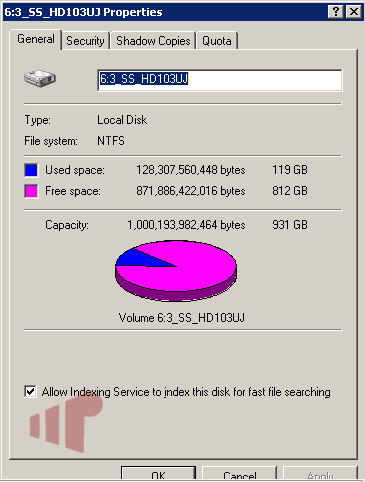
Give the drive a name, similar to the folder naming scheme you decided to use earlier. In my case, I used the numbering scheme, followed by the make and model of the drive. Personally, I have 2 different brand drives and 3 different models, but they’re all 1TB, so this comes in very handy. When you’ve got it named, click “OK”.
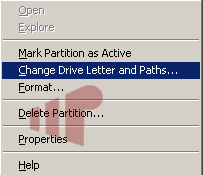
Once again, right-click the partition, but this time select “Change Drive Letter and Paths”.
There should be nothing showing in this screen. If there is, you probably selected the wrong drive. VERIFY!
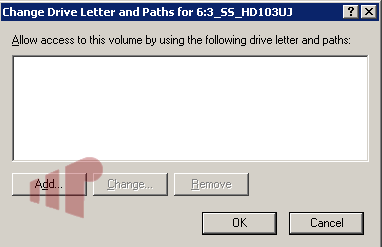
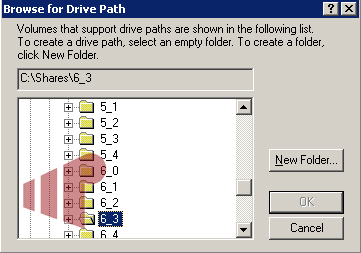
Click “Add”.
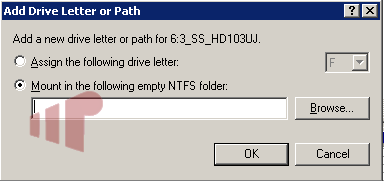
Browse to the folder you created on your C: drive and click OK.
Click OK until you’re back at the Computer Management screen.
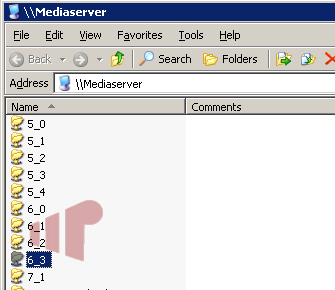
At this point, you should be able to see the share in your usual “Shared Folders” link for WHS, listed right alongside the folders which are still part of your pool.
Right-click the new share and select “Properties”.

Add any permissions you added back at the beginning of the guide. If you removed the “Everyone” group back then, also remove it here. DO NOT remove any other groups that Windows put in there by default.
When you’re done, click OK.
Open up your “Shared Folders” on one of your other computers and ensure you can see the files. If that’s the case, go ahead and repeat this process for the next drive in the pool.
Assuming you can’t finish removing all your pooled drives in one session, you can add the new share (or shares, depending on how many drives you removed) to SageTV and it will find the media again, retaining all the metadata. If you created multiple Music, Photo, Movie, etc., folders, ensure you add them all back into SageTV. Additionally, if you moved any directories used by plug-ins (i.e. fanart), ensure that you reconfigure the plugin for the new directory location.
That’s it! You’re free of Windows Home Server’s Drive Extender technology. You can now add these drives to WHS 2011, utilize them in a DE alternative, or repurpose them for something else entirely.