
Migrating the MythTV Database Between Installations
For years now I’ve been running the same Linux installation and the same MythTV installation on the same hardware. From time to time I would upgrade the MythTV installation or the OS to the latest revision but it was always an upgrade from the previous and not a clean install. However, earlier this summer I was faced with a hardware failure in my server. All of the data was okay but I figured that as long as I had the system down I might as well bring it up-to-date as well (the setup had been stable for me for a couple of years now so I hadn’t touched it – it if ain’t broke, don’t fix it). In the past, this would have involved some command line kung fu dumping the MySQL database and then restoring it on the other system. Now days it is much easier.
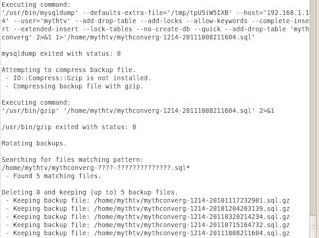
Starting in version 0.22 MythTV includes a pair of utilities that will do everything for you. mythconverg_backup.pl is a script that will export your current database (called mythconverg by default) leaving you with a g-zipped SQL file similar to mythconverg-1214-20110715164732.sql.gz. For those that are curious the naming convention is <database name>-<DatabaseSchemaVersion>-<date and timestamp>.sql.gz.
Before running the tool it is recommended to create a configuration file placed at “~/.mythtv/backuprc”. At a minimum it is a good idea to specify where the database backups will be put once they are created. For example:
DBBackupDirectory=/home/mythtv
This will create the .sql.gz file under /home/mythtv.
Note: Linux is case sensitive so be sure that you capitalize the correct letters.
If you would like to use something other than the default filename you can also specify it in the .backuprc file using:
DBBackupFilename=<filename>
Where <filename> is the name of the backup that is created. For further options you can run
./mythconverg_backup --help
or
./mythconverg_backup --help --help
At this point everything should be setup to create backups of your database using the following command
./mythconverg_backup
If you would like to be able to watch the progress you can instead run
./mythconverg_backup --verbose
Once the database backup has been created and moved over to the new system it is a good idea to once again create a “~/.mythtv/backuprc” file containing the location of the database file to restore. For further options you can run
./mythconverg_restore --help
or
./mythconverg_restore --help --help
If you have a database in existence on the new backend that you don’t intend to keep (you’re copying over the database from your old backend right?) then you can restore the database with the following command:
./mythconverg_restore --drop_database --create_database –verbose
After some time (depending on how much is in your database) you will see the message “Successfully restored backup.” At this point you are ready to launch the MythTV frontend. When you first start up mythfrontend you may be given a message stating that your database schema is a few revisions behind and it will exit the application. This can be resolved by launching the mythtv-setup tool. Once this tool starts up it says that your database schema is out of data and asks if you would like to upgrade it. Say “Upgrade”. Then it will tell you that it will make a temporary backup of your current database in case something goes wrong. Say “Upgrade” again to start the upgrade. Once this is complete, you can exit mythtv-setup and re-launch mythfrontend. Once this starts up you may get similar notifications that your music and video schemas are out of date but these can be upgraded from within mythfrontend. Once all of the updates are complete you will finally be greeted with your MythTV main menu and will be ready to start watching TV and movies. It may be a good idea to cruise through all of your settings to make sure that everything looks good. If it is all OK then sit back and enjoy your migrated database.