
Intel DH57JG and Core i3-530
Intel DH57JG and Core i3-530 ReviewWith more mini-ITX options than ever it’s a great time for small form factor (SFF) PCs. Enthusiasts are finding more ways to get the most out of these tiny boxes both in the A/V stack and backing it. Take a look with us at the soon to be released Intel DH57JG motherboard paired with a Core i3-530 to find out if the tiniest member of Intel’s Clarkdale offering can bring a full featured HTPC to the SFF world. |
System
Board Specifications:
| Form Factor: | Mini-ITX (6.7” x 6.7”) |
| CPU Support: | Core i5-6xx, Core i3, LGA1156 Pentium |
| Chipset: | Intel H57 |
| Memory: | Two 1066/1333MHz DDR3 DIMM Slots (8GB Max) |
| GPU: | Integrated Intel HD Graphics (HDMI & DVI on I/O panel) |
| LAN: | Gigabit (10/100/1000) via Intel 82578DC Ethernet Controller |
| Audio: | 10 analog channels (7.1+2) via Realtek ALC889 8 digital channels (7.1) via HDMI |
| Expansion: | PCIe 2.0 x16 slot |
| I/O: | 12 USB(6 on I/O panel & 6 via internal headers) 4 SATA + 1 eSATA (I/O panel) with RAID support |
System Specifications:
| CPU: | Core i3-530 (2.93GHz 73W TDP) |
| GPU: | Integrated HD Graphics (733MHz) |
| RAM: | 4GB G.SKILL DDR3 1600 (2x2GB @1333MHz) |
| BD Drive: | LITEON iHOS104-06 |
| Storage (Windows 7): | 80GB Intel X25-M G1 SSD |
| Storage (WHS): | 1TB Samsung F1 & 320GB Seagate 7200.10 |
| PSU (ATX): | Antec EarthWatts 80+ (380W) |
| PSU (alternative): | picoPSU-XT-150 (150W w/ 120W power adapter) |
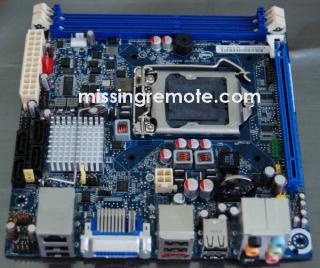
Having earned most of my “cred” building full-ATX PC (yes, even the HT kind) every time I see one of these boards it amazes me how much functionality gets crammed into such a small package. Mini-ITX motherboards are intended to be compact and it is understandable that there will be layout trade-offs made for the possibilities the form factor enables and the DH57JG is no exception. Despite this caveat I do need to question the placement of some of the headers, most notably the front panel (circled in orange below) near the back I/O panel.

|
The issue this creates is best captured by looking at the picture (above) of the board after it was installed. The white cable is for the power button, and is pulled quite taut in the case. Fortunately the cable was long enough so everything worked out, but I did think (after the cursing stopped) that some day it would be nice to ask the engineer who placed the front panel header on the furthest point of the board from where it needs to be “Why?”.
My only other points on layout are the location of the third USB (red) and the front panel audio (green) headers, which are relatively minor. Neither is cause for much concern but the USB is hard to utilize with the I/O shield in place (fortunately there are two others); and depending on how flexible your case’s audio connector the location could potentially apply pressure on any PCIe cards installed in the x16 slot.
Before moving to the I/O panel I would like to comment on the noise levels output by the heatsink and fan (HSF) on the retail i3-530. I don’t know if this in aberration as the fan that came with the i5-661 tested earlier, while pretty quiet was still audible; where this fan, which has a slightly different design, is need-to-put-your-face-on-the case-to-hear-it silent. As someone who usually leaves the retail HSF in the closet, it was great to not need to find a replacement.

|
The I/O panel has all of the necessary connectors for serious HTPC use including DVI, HDMI, plenty of USB, an eSATA port, Gb Ethernet and an optical S/PDIF (TOSLINK) connector. Notably missing are any legacy components (i.e. PS/2) so plan ahead.
The BIOS is the standard Intel fare with only the basics exposed. All of the screens have been captured in the gallery below, but there are a few worth some discussion. Also worth noting, was that the POST splash screen (i.e. press F2 to get into BIOS) was visible when connected over HDMI.

|
Like most boards the DH57JG’s default SATA mode is IDE and not the optimal AHCI mode that makes the eSATA port truly useful, and enables the other good stuff (like NCQ) that SATA 2.0 provides. While I understand the reasoning behind this and probably shouldn’t complain (more on this point later), I still think that the best setting should be the default. That said, Intel did let me know that they intend to make the switch to AHCI as default in most of their next generation boards, so this won’t be issue much longer.

|
Interestingly there is a setting for protected audio video path (PAVP) in the video configuration. For those familiar with the DG45ID, this is the setting that brought Intel much pain when it was toggled to “Paranoid” (which thankfully is missing) and the setting hidden in one of the early revisions disabling GPU accelerated video decoding (DXVA).

|
Like the DH55TC this board also lets the user decide how the system should indicate that it’s in standby. Few things kill the CE experience for me like the “PC Blink” when the system is sleeping.

|
 |
 |
|
 |
|
 |
 |
 |
 |
 |
 |
 |
 |
 |
 |
 |
Windows Home Server
The first thing I thought when I found out about the i3 family and this motherboard was “Wow, that’s going to make a killer SFF HTPC”; the second “wouldn’t make a bad Windows Home Server (WHS) either.” So before we talk about the how the DH57JG and Core i3-530 fit into the A/V stack let’s take a look at how it will handle serving content to it.
So here’s where I should just shut it on the AHCI complaints, because when I tried to install WHS it would get just past the “press F6/F2 …” notices and BSOD. The problem of course is that WHS, which is based on Windows Server 2003, doesn’t have the necessary AHCI drivers included. The issue was compounded because the DH57JG is a legacy free motherboard and there isn’t a floppy header on the board. Not wanting to wait until Monday to borrow a USB floppy drive from work I decided to continue the install in IDE mode and figure out how to get back to the optimal configuration later.
Fortunately I found a guide for making the switch in XP, and then adapted it for this board. The process below should also work for XP (we really need to talk if you’re planning to run XP on this board ;)) but it wasn’t tested.

|
First thing is to grab a copy of the Intel storage drivers , but because the controller isn’t in AHCI mode yet they won’t install. To get around this we need to run the MSI in administrative mode (“setup.exe -a”) and extract the files we will use. Once that’s done, open up Device Manager and find the “Primary IDE Channel” device under “IDE ATA/ATAPI controllers”, right click on it and select “Update Drivers”. Click through the dialogs to get the “Have Disk” (the guide linked above has more detailed instructions).

|
Then “Browse” to where the drivers were extracted and select “iaStor.inf”

|
Finally, select the AHCI controller driver, click through the dialogs, and reboot the PC. Make sure to change the SATA mode to AHCI in BIOS before WHS starts and you’re all good.
Other than that, the process was uneventful. I used the XP drivers for everything else and it all worked great. Before taking a more in-depth look at performance in Windows 7, check out the basic power numbers below.

|
As expected power numbers were quite good, but it should be noted that these metrics were generated running the system with a picoPSU-XT-150 (150W) power supply unit (PSU) so they will be slightly higher with a standard ATX PSU (this is discussed in more detail later).
Windows 7
OS installation was straightforward and easy; just make sure to have at least the network (NIC) driver on hand because there isn’t one included in Windows 7. After installing all the drivers it was time for the obligatory WinSAT screenshot.

|
Overall the scores were quite good with the video subsystem presenting the lowest values, but as we know gaming performance only has a cursory relationship with what we’re interested in (A/V performance). But before we get to that let’s take a more look at system configuration and performance.
For most of the testing the system was connected via HDMI through an AVR to a 1080p plasma, but I’ve seen some questions about how to deal with overscan issues on rear projection TVs (RPTV) that are detected as “Digital Displays” instead of a “Digital Television” (where the capability is automatically enabled). My first HDTV was a 720p DVI connected Samsung DLP that now serves time in the family room, so when the question came up it was worth some time to try something besides HDMI.

|
At first I was a confused as well because by default “Scaling” is set to “Maintain Display Scaling”, and it isn’t obvious that the horizontal/vertical sliders will not display until “Customize Aspect Ratio” is selected.

|
After that it’s easy to adjust the desktop to fit the RPTV’s screen.
Switching back to the main HDMI connected environment special attention was paid to issues around standby/resume and source selection. In this case the lack of problems is news. Each permutation of CEC on/off and selected/not selected input was tested entering standby and then resuming as well as booting the system with the AVR/TV turned off. In each case everything just worked, the only complication noted was that the display initializes as a 1024×768 device then changes to the correct resolution (probably by reading the EDID) immediately. While this happens faster than humanly perceptible, it can be caught by applications and present an issue if they are not aware of the behavior.
For those looking to do more than just watch video, or to build a SFF Windows 7 Media Center (7MC) “extender” both a Hauppauge HVR-2250 and Avermedia M780 were installed in the PCIe x16 slot and tested successfully in 7MC. Once recording was working it only made sense to see how the Core i3-530 handled our ShowAnalyzer (SA) test files.
System Performance
For those unfamilar with SA it is an application that scans video files for commercials so other applications can remove or skip them during playback. SA is one of the most demanding applications I’ve seen, and makes an excellent test tool because of the stress it places on the box both through large amounts of I/O and excellent multithreaded CPU punishment.
In this test three containers (MPG, WTV, and TS) with MPEG-2 and H.264 were scanned on five different machines.
 |
Not surprisingly the 2.93GHz i3-530’s performance was a bit behind the 3.33GHz i5-661, competitive with the quad core 2.4GHz Q6600 and much faster than the two core 2.5GHz E5200.
Unfortunately I misplaced the test file used in our previous Handbrake test so a new file (a 31m 53s 480i AVC/AC-3 HD PVR recording) was selected. For those who don’t know, Handbrake is a popular transcoding utility and a great way to isolate and measure multithreaded CPU performance. Note that each test system is using a standard ATX power supply unit (PSU) for this test, which impacts power usage (see the next chart for differences between a standard ATX and the picoPSU).

|
Again results are in line with expectations with the i3-530 just behind the i5-661 and Q6600 in raw performance, but only the E5200 (which is significantly slower) is more power efficient at full utilization.
Taking a closer look at power usage, the chart below notes some common scenarios and power corresponding consumption with a standard ATX PSU and with a 150W picoPSU. For those unfamiliar with picoPSU it is a fanless, highly compact PSU with the AC/DC conversion brick outside the PC, very similar to what a laptop uses. While the main benefit is the form factors it enables because of its size (which makes it a perfect fit for this system) as a completely passive device and having much lower power conversion requirements it is more efficient compared against conventional ATX PSU.

|
Looking at the breakdown it’s clear that the system turns in very impressive consumption numbers with either PSU choice in all scenarios. Most notable are the idle (30-31W standard and 22W picoPSU) and media playback with hardware acceleration enabled (43-53W standard v. 36-47W picoPSU) values. Note that all of the power numbers were generated while using a SSD so they will be a bit higher with a mechanical drive; see our look at SSD v. HD performance for more details.
Before we get to media performance let’s touch briefly on CPU temperature and the associated fan speed in three simple scenarios. Note that these values were captured while using the picoPSU which doen’t have the active cooling found on standard ATX PSU. Temperature and RPM were measured using Intel’s Desktop Utility (IDU) application, but speed is actually controlled by the board itself via settings exposed in BIOS.
 |
As the CPU moves from the idle (30 °C) to BD playback (42 °C), and finally full CPU load (71 °C) using Handbrake.

|
We can see corresponding changes in fan speed. But, as noted earlier, even as RPM went up noise levels were extremely low. I did find it strange that fan speed did not change at all between 42 °C and 71 °C, but as IDU considers 71 °C still in the “green” the behavior is probably intentional.
Media Performance
Audio
There isn’t much to add on the audio front that hasn’t been covered before, but we’ll hit the basics. Like all Core i5/i3 processors paired with an H55, H57, or Q57 chipset the DH57JG and i3-530 supports multi channel LCPM and HD codec (Dolby TrueHD/DTS-MA) bit streaming over HDMI. The feature works well with the most recent retail versions of Cyberlink PowerDVD9, Corel WinDVD 2010 and ArcSoft Total Media Theater 3 (TMT) (current TMT owners can apply the .170 patch) Blu-ray (BD) playback software and recent SourceForge.net builds of ffdshow with MPC-HC splitters (the Haali MKV splitter has some issues).
Video
Like audio, the video performance of the DH57JG and Core i3-530 was the same as what we saw earlier. On the good side it includes excellent picture quality (PQ) and deinterlacing (DI) performance on par or better than the discrete cards tested. When we took our first look at the Clarkdale platform the HQV HD benchmark was not available; since that time IDT has released an updated version and was kind enough to provide MissingRemote a copy.
We’ve all seen results generated using earlier versions of the test, but never having run through the scoring before I never realized how subjective the final numbers can be. So it’s best to take the numbers only as authoritative in the context that created them (i.e. I was sitting 3’ from the display and am really picky); presenting a single number would not be useful, so an ATI 4650 running Catalyst 10.2 was used for comparison.
 |
IDT did a good job of making a tough test and neither card performed that well in the first two test classes (but Class 2 is where the i3-530 was markedly better — mainly in the upscaling tests), most notably with multi-cadence DI where both scored zero out of thirty. Results for the other DI patterns were consistent with what we saw in the earlier tests with the Spears & Munsil BD benchmark with the i3-530 having a slight edge. For anyone interested in the detailed results a PDF is available with the scoring guide found here.
There has been some movement in the “needs improvement” area, but the platform remains unable to negotiate a secure HDCP path through my Denon AVR-1909 and suffers from black clipping/brightness issues by default. Intel has reproduced the HDCP issue in house with a Denon AVR-1909 and according to board engineering the root cause seems to be the Silicon Image (SI) chip in the AVR. They recommend using a longer HDMI cable which provides more margin for the SI chip to respond to the HDCP signals sent from the motherboard. The longest cables I have are 6’ and do exhibit the issue, so I’ve asked for more guidance on how long is long enough. We’ll keep you updated when more information is available.
UPDATE – 03/22/2010:
I picked up a 15′ HDMI cable per Intel’s recommendation and using it the board was able to successfully negotiate a HDCP connection during Blu-ray playback. A big thanks to Intel for the follow up and workaround.
The brightness issue covered in the earlier review, which did get much better with later drivers (although never fixed completely) has regressed in the most recent release (15.17.0.2086). The regression has been reported as well as the continued need to provide a comprehensive fix.
 |
Once corrected the black clip/brightness issues do go away and levels were consistent for all the content and each player tested except the most recent version of TMT (which is required for HD bit stream support in TMT) where levels are incorrect during BD playback but consistent with other players for non-BD media types. This issue, as well as a UI issue when using the TMT Media Center player (uMCEDVDPlayer.exe) where hardware acceleration appears to be disabled, has been raised with ArcSoft. They did let me know that they will look into the issues, but have not provided an official comment on either.
UPDATE: We heard back from ArcSoft on the consistency issue during BD playback and the root cause appears to be a problem with TMT video renderer applying PC luminance values when a TV is used as the display.
Despite the regression the most recent driver does include an enhancement that makes it worth the download.

|
As we can see several new refresh rates were added including the 23Hz necessary for 23.976 FPS support. I did test it with my display which accepts 24p but does an internal 2:3 pulldown and content played without any noticeable issues, but sadly my lack-of-a-proper-24p-display issue has not been addressed so the functionality cannot be confirmed.
Conclusion
In our previous look at the Clarkdale platform we examined the higher end and found it quite capable; this time around we’ve taken an even more detailed look at what the smallest motherboard available and lowest power Core i3 can provide for storage and the HTPC. Combining low power usage, excellent system performance, and advanced media features like HD audio bit streaming and dual hardware accelerated HD video decode the Clarkdale platform is a serious contender in the HTPC space, with the DH57JG Intel has broadened the reach of the platform to the SFF PC with a mini-ITX board that provide the same system and media capabilities in an incredibly compelling form factor.
Scheduled for retail availability in mid-March with an MSRP of $125 the DH57JG provides a competitively priced and extremely versatile platform for the HTPC or WHS. Anyone looking for a real PC in a small box should seriously consider this system for their build.
Pros:
- Very low power consumption
- Excellent picture quality for every format tested
- Deinterlacing performance as good as or better than discrete cards
- HD codec bit streaming and multi channel audio support
- Performance competitive with previous generation quad cores packed into a flexible form factor (mini-ITX)
- Correct[able] black levels for all content – pictures and video with minimal tweaking
Cons:
- HDCP issues with Denon AVR-1909
- Some tweaking required to get proper black and brightness levels during video playback
- Wonky front panel header placement
Lastly, I would like to thank Intel for providing the sample for review.
Hi, Do this motherboard
Hi, Do this motherboard output TRUE full hd resolution (1920 X 1080 ) or only a simulation or something else? I will buy one but I need make sure about this question.
Thansk you very much for your review! It helped me a lot.