
Display Rendering Stats in MPC-HC

Every so often I see a question about how we generated the detailed display information used in our HTPC reviews. It’s not hard to setup, but I figured that it was time to document the process in a single, easy to find place. Let’s get started.
Necessary Software:
- DirectX Runtime
- MPC-HC (I prefer the zip installer-less, version)
- LAV Filters (optional)
DirectX Runtime
The DirectX Runtime download will not run the installer directly so it’s a bit more involved than it should be.

Click “Yes”

Enter a folder name. Doesn’t really matter what, just make sure you remember what you put in because you’ll need to find it and cleanup when we’re done.

If the folder doesn’t exist you’ll be prompted to create it.

Won’t take long :).

Go find “DXSETUP.exe” in the folder we just created to hold the extracted files.
This part is just click through until you’re done.
MPC-HC
Since it’s a bare-bones media player MPC-HC can take a little bit to get used to, and some of the settings we need to change can be difficult to find.

Open the Options dialog, found on the “View” menu.

Find the “Output” section under “Playback”. The default setting, “Enhanced Video Render (custom presenter)”, is the one we want. Confirm that it is selected.

There was a time when the MPC-HC internal filters were state of the art, but that’s no longer true. The software decoders are good enough to measure refresh rates so we can use those, but the DXVA versions aren’t always stable across platforms so navigate to the “Internal Filters” section and uncheck MPEG-2 Video (DXVA), H264 (DXVA), & VC1 (DXVA).

Load a video file either from the file menu or by dragging it onto MPC-HC. Then select “Display Stats” from “View : Renderer Settings”. There is also a convenient keyboard shortcut (Control + J) to toggle the setting on/off as well.

After enabling the statistics will be written over video playback. Press “Control + J” a couple times to turn it off again.
LAV Filters (optional)
As I mentioned previously, MPC-HC’s internal filters aren’t the best option. LAV Filters combine the best file splitter and decoders into a single installation package. It’s a click through install and the settings dialog is very straight forward so I’ll skip it for now, but getting them setup inside of MPC-HC requires specific configuration.

Disable all of the source and transform filters by unchecking them. Make sure to scroll down through them all.
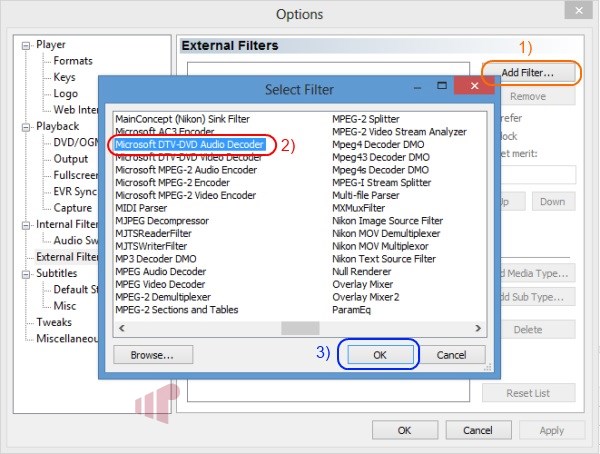
Then select “External Filters” and click “Add Filter” to select each of the filters in the list below. Pay close attention the toggle selected, we need to add some and block others.
The two Microsoft filters (on systems with Windows Media Center installed) need to be blocked, so after adding them make sure to select “Block” on the right side. Then add each of the LAV filters shown and select “Prefer”.
With this setup not only can you check the accuracy of your GPU, but also watch pretty much anything in MPC-HC.
I guess I am crazy I see all
I guess I am crazy I see all this talk of LAV filters everywhere. I gave them a go and honestly couldn’t tell the difference between them and the default mpc-hc 64 bit decoders (I had 32 bit installed when testing LAV filters). I couldn’t get MPC-HC to exit correctly with 32bit version for some weird reason so went back to 64bit and built in. Now on non bluray content I can definately see the difference in the LAV filters as the built in render SD terribly. My 2 cents anyones.
If the decoders are doing
If the decoders are doing their job properly there won’t be a quality difference. The deltas are in flexibility (DXVA/SW/non-DXVA GPU HWA), stability and power consumption.
This doesn’t discuss using
This doesn’t discuss using MadVR as the Renderer but the action is the same. In MPC-HC, hit cntrl J and up pops the stats screen.