
Fractal Design Define R4 ATX Chassis
Fractal Design made a great impression on us last year with the debut of the Define R3 ATX chassis and its smaller sibling, the Define Mini Micro-ATX chassis. It is hard not to love a high-quality, well-built, sleek and unobtrusive chassis and these are all qualities the Define series of chassis exhibited to us. Not content to rest on its laurels, Fractal Design went back to the drawing board to come up with several enhancements to the design of the R3 with the new Define R4 ATX chassis.
The main refinements offered by the Define R4 are larger and improved fans, a more flexible hard disk drive (HDD) cage, a wider case body for easier cable routing, additional mounting options for 2.5” SSDs, a new tool-less front fan holder, support for liquid cooling radiators, a new fan controller that is integrated with the front panel, and an additional USB 3.0 front panel port.
Specifications
|
Material |
|
|---|---|
|
Motherboard |
|
|
Drive Bays |
|
|
Cooling |
|
|
Expansion Slots |
|
|
Front I/O Port |
|
|
Power Supply |
|
|
Weight |
|
|
Dimension |
|
Test System
|
Motherboard |
Intel DH67BL |
|---|---|
|
CPU |
Intel Core i5-2500k |
|
CPU Cooler |
Scythe Mugen 2 |
|
Memory |
8GB (2x4GB) Patriot Signature DDR3 PC3-12800 |
|
GPU |
NVIDIA GTX 560 Ti |
|
Hard Drive / Solid State Drive |
500GB Seagate 7200.12 7200RPM 120GB OCZ Vertex 2 |
|
Optical Drive |
Samsung 22X DVDRW SATA |
|
Power Supply |
PC Power & Cooling Silencer 750W 80Plus |
|
Operating System |
Windows 7 Ultimate 64-bit |
Packaging and Hardware
The Fractal Design Define R4 came generously protected in a carton suitable for surviving the typical shipment. The full package includes the following items:
- Define R4 enclosure
- Package of screws, cable ties, standoffs and spacers
- Manual
Like the Define R3, the R4 is a bit of a “beast”, weighing in at just over 27 pounds. Upon opening the chassis and examining the construction and materials, the weight is well explained and even appreciated. Rugged, solid, sensible and refined are all words that come to mind when studying the Define R4.
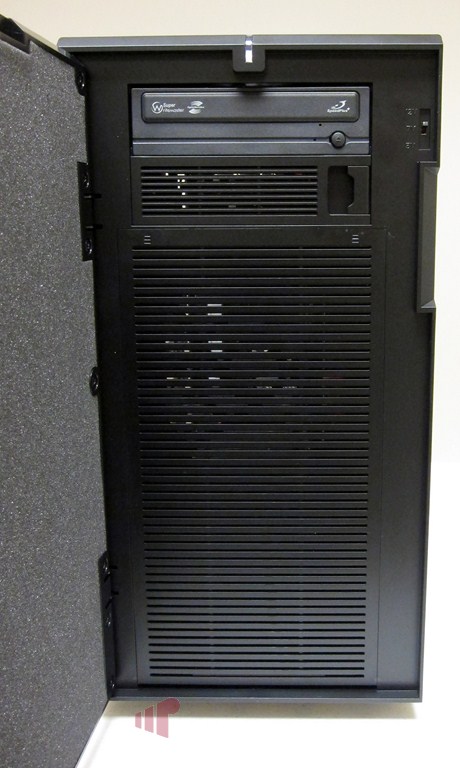
The power button gives a rewarding feel when engaged and is flanked by two USB 3.0 ports and two USB 2.0 ports, the reset switch and headphone/microphone jacks. We were a bit disappointed that the seldom-used reset switch was moved from its location hidden behind the front door, but at least it requires deliberate push to engage. There are four anti-skid feet protecting the bottom and raising it high enough off the ground to get a good grip for moving.
Opening the front door is inspiring–the metal hinges are sturdy and smooth. Inside the door we find some foam insulation. Fractal Design’s attention to detail continues with the two louvered plastic 5.25” bay covers and a louvered fan cover. The bay covers open simply by pulling the lever on the right and the fan cover requires a simple push inward to reveal the dual fan filter holding an included 140mm fan, which is easily removed by depressing a tab on the top. If there was a sore spot for users of the Define R3 or Define Mini, it was that the fan filters were held in by screws, so this was a sensible improvement. Another conveience feature worth mentioning is the addition of the integrated fan controller switch in the upper right front. Closing the door, the pull of the magnets in the door assures us that there will be no accidental openings.
Continuing toward the back, we find the optional top exhaust fans. At the rear, the power supply unit (PSU) opening is on the bottom along with the white expansion slot covers, motherboard I/O plate opening, and included exhaust fan.
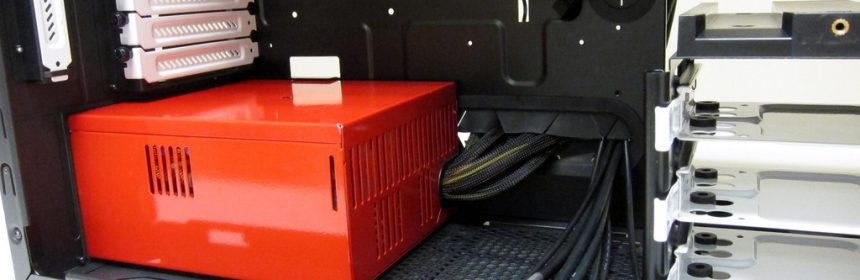
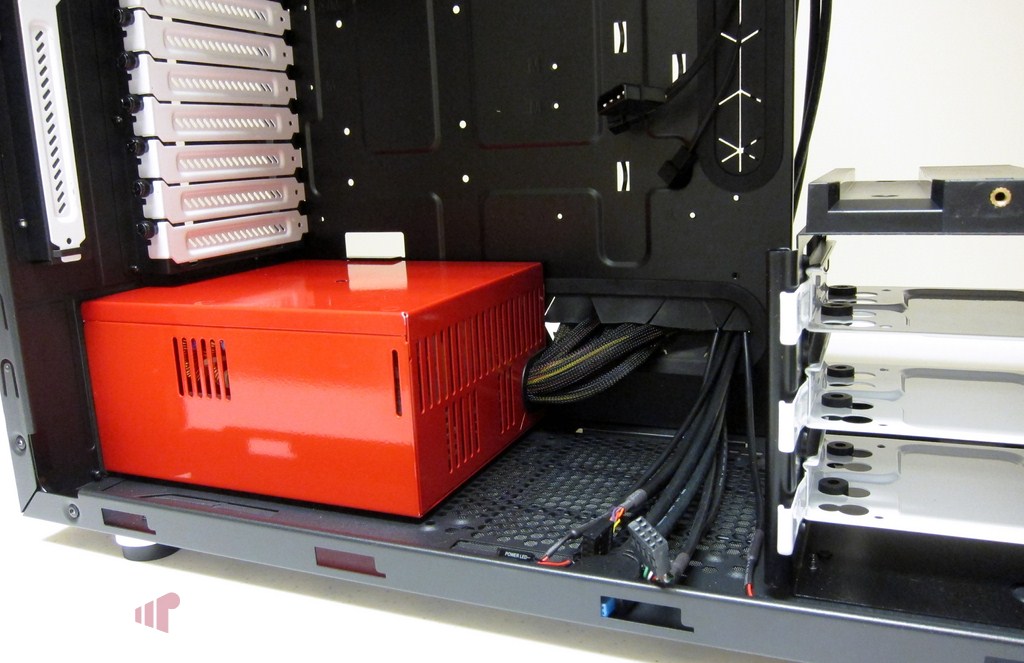
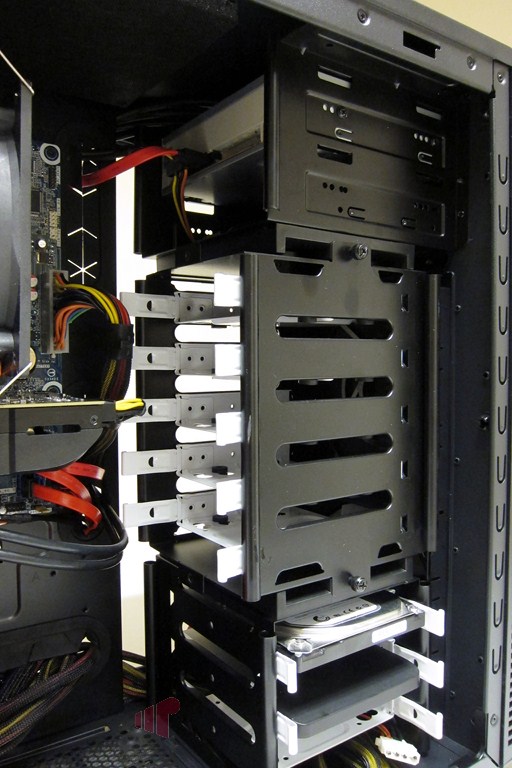
The side panels (also available with a window) are each secured by two thumbscrews and strike a perfect balance between being too thin and flimsy and too thick and heavy. Furthermore, the doors and optional fan openings are generously treated with sound dampening material. Another filter has been provided on the bottom for the PSU inlet and an optional bottom-mounted 120mm inlet fan. There are two drive cages, holding eight drive trays (which can handle 2.5” or 3.5” drives) continuing the distinctive, white-on-black look. The top drive cage is removable and rotatable by 90 degrees while the bottom tray is removable and relocatable allowing the use of a front radiator for liquid cooling applications as can be seen from this Fractal Design video. A 5.25” to 3.5” drive bay mount has been included. There are soft-covered cable management holes and tie spots galore along with an opening to allow easy installation of CPU cooler plates.
Overall, we are impressed by the high level of quality, thoughtful design, inspired feature set, and elegant aesthetics.
Build
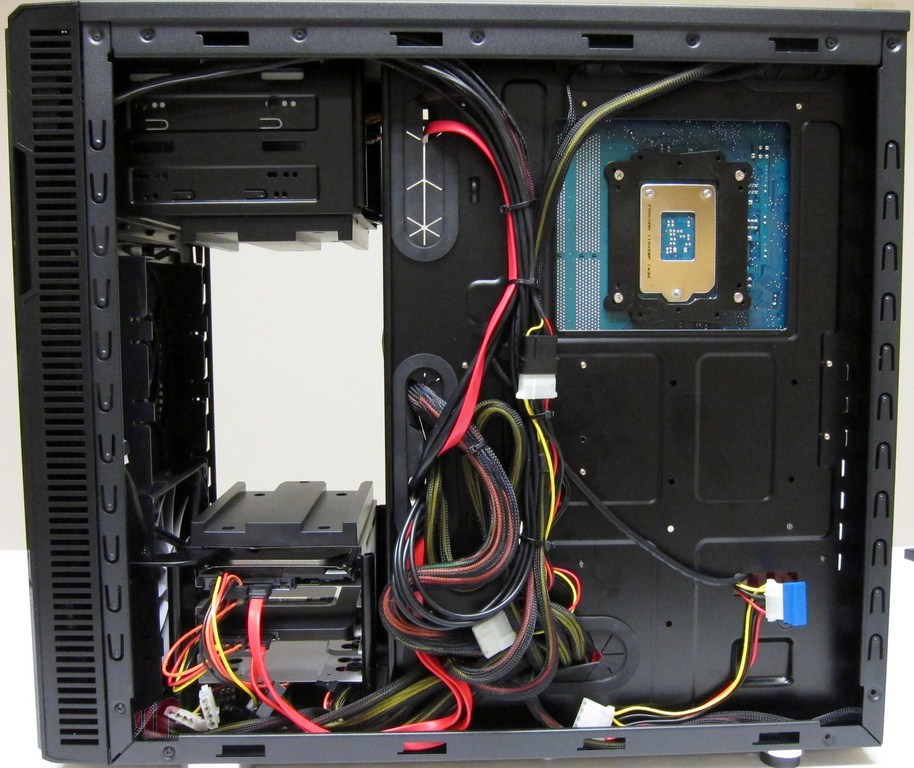
We installed our non-modular PSU and fed all the cables through a hole, placing them on the back side of the motherboard tray. The PSU to chassis interface is smartly padded both on the bottom and rear positions. The cable management holes are all covered with a soft silicone material which offers an additional level of protection for both the cables and our hands, in addition to a more appealing interior appearance.
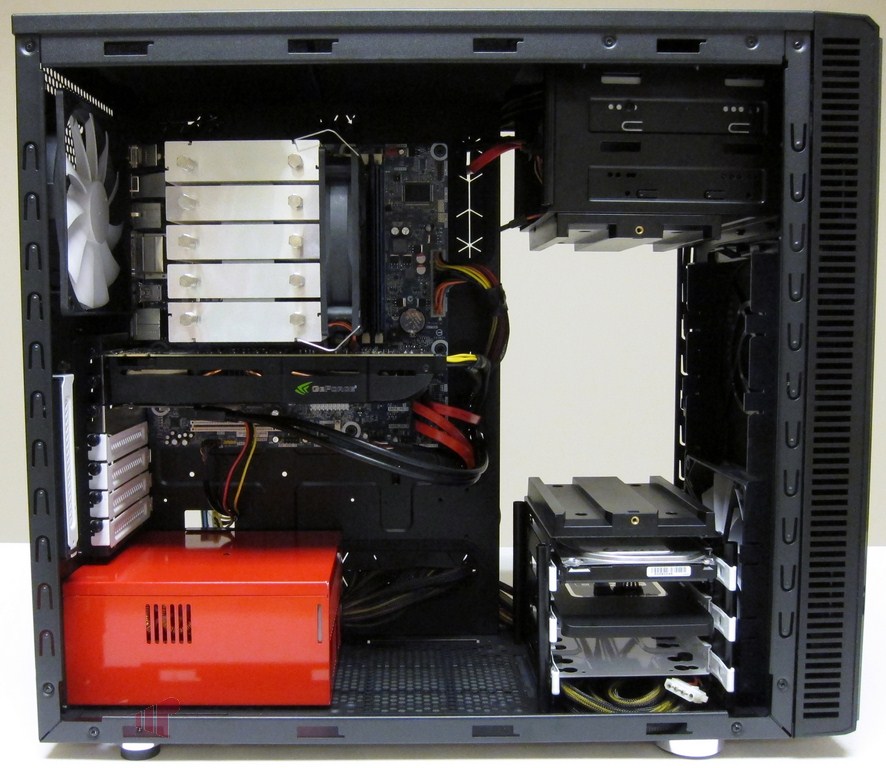
In the final step, we placed an SSD, HDD and optical drive in the chassis. The top drive tray was rotated 90 degrees which offers a more direct airflow path when utilizing the top 140mm inlet fan option.
We put together a video of the assembled chassis to give you another look.
Thankfully, there were no sharp edges to worry about and the assembly process was as easy as it gets. The chassis was powered on to begin testing. The blue power activity LED is fairly bright, but gives off a pleasant glow. Unfortunately, like the Define R3 and Define Mini, the Define R4 is deficient of a disk activity LED.
Performance
For performance testing, we used synthetic tools to create a fairly worst-case scenario. We loaded all four cores of the Core i5-2500K CPU with the Prime 95 In-Place FFT test; the GPU was stressed at 1080p with FurMark and HDD I/O was created with the PassMark Advanced Disk Test using the Workstation profile (70% read/30% write).
The included 140mm fans were controlled by the integrated fan controller and measurements were taken at all three settings with the CPU and GPU fans allowed to be automatically controlled by the motherboard and GPU. We mounted the included 140mm intake fan in the bottom slot to cool the SSD and HDD. For both load and idle measurements, we let the loads take their toll for an hour and then recorded the measurements.
|
Load (12V) |
Idle (12V) |
Load (7V) |
Idle (7V) |
Load (5V) |
Idle (5V) |
|
|---|---|---|---|---|---|---|
|
Ambient |
23 C |
23 C |
23 C |
23 C |
25 C |
24 C |
|
|
|
|
|
|||
|
CPU |
64 C |
33 C |
64 C |
33 C |
64 C |
35 C |
|
VR |
43 C |
28 C |
43 C |
29 C |
49 C |
32 C |
|
Memory |
41 C |
30 C |
41 C |
31 C |
51 C |
33 C |
|
PCH |
55 C |
46 C |
58 C |
46 C |
62 C |
49 C |
|
GPU |
82 C |
32 C |
82 C |
30 C |
82 C |
31 C |
|
HDD |
33 C |
30 C |
36 C |
32 C |
37 C |
33 C |
|
SSD |
30 C |
30 C |
30 C |
30 C |
30 C |
30 C |
|
|
|
|
|
|||
|
CPU |
405 RPM |
397 RPM |
413 RPM |
390 RPM |
458 RPM |
405 RPM |
|
GPU |
2100 RPM |
1470 RPM |
2100 RPM |
1470 RPM |
2100 RPM |
1440 RPM |
The Define R4 performed admirably with our mid-grade Intel Sandy Bridge system. It is clear from the results that the slower fan speeds do result in higher system temperatures though they are still well within spec and not at all cause for alarm. The GPU and CPU fan speeds are quite modest given the heat load. The interior space and 140mm fans are no doubt making a positive impact on the system both in terms of heat removal and overall system noise. Clearly, the Define R4 can support much more heat load than we’ve provided especially considering we’ve only populated two of the seven 140mm fan positions.
Conclusion
Fractal Design has taken a great chassis in the Define R3 and made it even better in the Define R4. The improved cooling and noise performance, along with the more convenient fan controller, the expanded room for cable management and the easier to clean front fan filter are all smart and welcome improvements. While not entirely necessary, we would like to have the option of a drive activity LED and a completely tool-less chassis. With a current street price hovering around $110, it’s impossible to deny Fractal Design’s Define R4 as anything but an excellent choice for workstations, servers and gaming desktops benefitting from the spaciousness, performance, convenience and refined elegance offered by the Define R4.
Pros
- Excellent cooling performance
- Quiet
- Plenty of room for excess cables
- Highly refined appearance
- Excellent quality materials and workmanship
- Convenient fan controller
- Flexible drive cage
- Accommodates up to ten drives
Cons
- No HDD LED
- Not completely tool-less
The Fractal Design Define R4 can be purchased from Amazon or Newegg and is available in Black Pearl, Titanium Grey and Arctic White all with or without side panel windows.
Thanks to Fractal Design for providing the Define R4 review sample.
Nice review Aaron.
How much
Nice review Aaron.
How much wider is the R4 from the R3? I built a computer for my parents with the R3, and the space behind the motherboard tray was a touch too small to easily get that panel on and off when wires are stuff back there. I was also worried that removing that panel would dislodge a sata cable and potentially damage the connector in the process.
Is the wire bundle for the front ports any longer? I recall that one or more of them were difficult to route— I think the reset switch was particularly short on the R3.
That being said, great case, and it looks like the R4 just fixes a few of the small issues.
Thanks for the comment.
Thanks for the comment. Andrew actually did the review on the R3 and I did the review for the Mini. In comparison to the Mini, there is certainly enough extra space for the power supply cabling to make sliding the door on more easily. I certainly didn’t have any troubles doing so with a 750W non-modular PSU and found the routing easier than the Mini. When I have a chance, I’ll provide a measurement for you.
There seems to be plenty of length on all of the provided cabling to adequately route. In fact, if you scan through some of the pictures in the gallery, you should be able to spot them.
I agree, the R4 is a nice refinement to an already excellent enclosure and should be on anyone’s short list of cases when looking for a full ATX chassis.