
ASUS AT3N7A-I ION Mini-ITX Motherboard
|
ASUS AT3N7A-I Motherboard Review
Few platforms have been as anticipated by the small form factor (SFF) Let’s take a look at ASUS’s AT3N7A-I to find out how the ION matches up against these expectations. |
Hardware and Specifications
Starting out with the specifications:
|
CPU |
Atom 330 (1.6 GHz Dual-core with |
|
Chipset |
Nvidia ION with integrated 9400M |
|
Front Side Bus |
533 MHz |
|
Memory |
2 DDR2 800/667 Dual Channel (4 GB |
|
I/O Panel |
1x VGA (D-Sub)
1x PS/2 Keyboard
8x USB
1x Blue Tooth (looks like an |
|
Internal Connectors |
1x PCI
1x USB
1x 24 pin standard ATX power
1x 4 pin auxiliary ATX power 2x 3-pin fan headers |
|
Form Factor |
Mini ITX 6.75" x 6.75" ( 17.1 cm x |
This was the first time I’ve seen a mini-ITX board
up close and I was immediately struck by how small an ITX board actually
is. With that in mind, I’m going to cut
ASUS some slack for header placement.
|
|

For the most part everything is well placed, but
there are two exceptions that may cause some pain depending on the layout of
your case. First, the only internal USB connecter
(blue header next to the three red capacitors) is located just behind the back
I/O panel, so you will need a long cable to connect up any USB ports on the
front. And second, if you are planning
to use the front audio ports break out the soldering iron because this header
(green) is on the wrong side of the PCI slot, which could also cause problems
if you need to use the slot.
|
|

The I/O panel is well thought out, with plenty of
options for everyone. Most notable is
the inclusion of coaxial and optical S/PDIF connectors alongside the
HDMI port. But given the board’s HTPC target audience, I
would have preferred to lose the PS/2 or VGA connector for a DVI-I
port, but
it’s nothing that a quick trip to Monoprice
can’t
fix.
Installing the board was very easy; the only problem
was with the I/O shield where I had to break out the pliers to adjust the metal
tab guarding the HDMI port to keep it from hooking the connector as the board
was levered into the case.
Bios
The BIOS is very full featured, including settings
for memory timings and voltage along with some options for front side bus based
overclocking.

|
Pictures of most of the screens are included below,
but I wanted to highlight a few specifically.
|
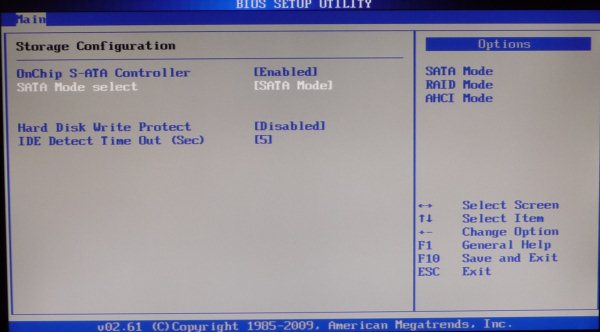
By default the disc controller mode (select "Storage
Configuration" from the first screen) is set to SATA. To get the most out of the E-SATA port (i.e.
support hot swapping) and make use of NCQ (Native Command Queuing, which can
increase performance by optimizing I/O) it must be changed to AHCI before installing
Windows.
|
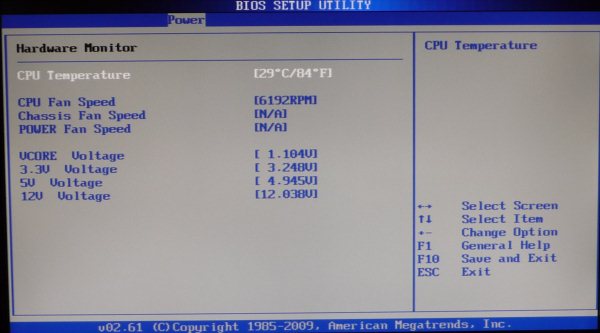
The first thing I noticed when turning on this system
was how loud the fan was; this screen in the BIOS tells us exactly why. Any fan that spins at 6000+ RPM is going to
be loud, and in this case it’s a 40mm that is not only loud but with an annoying buzzing sound that cuts through the room. If
the noise floor in your room is very high (e.g. data center or pool hall) it
might not be a problem, but in a normal environment the fan will need to go. Given that this board is designed and
marketed towards the SFF HTPC community it’s shocking that ASUS would ship the
board with this fan.
That said I wouldn’t consider it a blocking
issue. Given the location of the heat
sink, in the right case it should be possible to unplug it and rely solely on the
case fan. If that does not work, or is
not an option in the enclosure, fans are easy to replace. It’s not hard to find a quiet 60mm
replacement that could be mounted with a 45° rotation (using two screws) or
with a 40-60mm adapter.
|
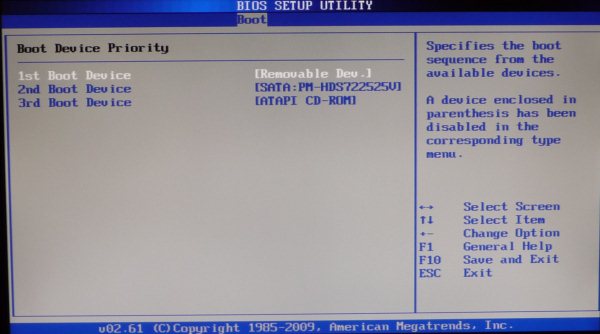
The last thing to note is only applicable to those
planning to install the operating system (OS) off a USB key. Oddly the USB drive was not included as
"Removable Dev" and was categorized with the hard drives instead. This means that you have to prioritize it to
do the initial file copy and OS install, and then go back into BIOS to change
to the hard drive during the first reboot.

|

|

|

|

|

|

|

|

|

|

|
|
|
|

|

|

|

|
|
|
System and Power Usage
OS installation was easy and even the drivers for
the onboard network adapter (NIC) from Realtek were included in the box with
Windows 7. While that’s not a knock
against other NICs, it does make pulling down the other drivers much easier
when you do not have a spare optical drive handy.

|
It’s pretty obvious from the WinSat score that this
is a lower end PC, but since that’s what we were aiming for, that’s a good
thing. Looking at the power numbers for
the board the low spec pays some pretty impressive dividends.
| State | Watts |
| Off (S5) | 5 |
| Hibernate (S4) | 5 |
| Standby (S3) | 6 |
| Idle (3.5" HD) | 38 |
| Idle (no HD) | 33 |
| Full Load (CPU) | 41 |
| Booting Win7 | 44-50 |
| 1080p H.264 (HWA) | 44 |
| 1080p VC-1 (HWA) | 44 |
While not as low as the numbers posted by the Habey
BIS-6550HD
these
numbers are still very good for a SFF PC and should translate directly
into cooling requirements.
The board also handled standby (S3) and hibernate
(S4) very well. On average, resuming
from S3 took about 5 seconds, and S4 in 25.
My only complaint, and this goes for every ASUS board I’ve used, is that
the power LED blinks while in S3. While it
is acceptable for a PC in the office to blink while in standby mode, it is not
for any CE like device. Fixing the
problem with some electrical tape or by unplugging the header is simple but
annoying.
Bluetooth is included as well, and had Windows 7
drivers been available would have been tested.
Not sure the majority of our readers would utilize it, but certainly a
nice addition for those with a Bluetooth keyboard or other device that could
take advantage.
Video Performance
Before digging into how ION handles Blue-ray and
other types of video content we need to briefly discuss how it handles
video
color space. For those who saw MR’s
review of the
DG45ID
this
test pattern will look familiar.
|
|

The screen capture above was taken when connected
using VGA,and we see exactly what we should.
The video color space is properly represented with 16-235 representing
the spectrum from black to white. Using
DVI (or an HDMI to DVI convertor cable) the result is the same.

|

|
Unfortunately this is not the case when using
HDMI. As we can see in these screen
shots take from Media Center and SageTV, the 0-255 range is inappropriately
used to represent black to white. All is
not lost however, as both applications provide a workaround for this
issue. Because the HDMI connection is
using the PC range, we just need to tell each application via a registry key
change.

|
For SageTV, download SageTV Registry Settings
and check the "EVR Uses PC Color Space" box.
And for Media Center add NominalRange(dword) = 1 to HKLM\SOFTWARE\Debug\ehPresenter.dll or
download and run this reg file.

|

|
After making the registry changes everything is displayed
properly.

|
Digging into the Nvidia control panel there is a
setting to limit video color space.
Crazy thing is that changing it doesn’t fix the issue, and actually
breaks our earlier efforts to fix the problem.
When it comes to Blu-ray the ION does very
well. Both Cyberlink PowerDVD 9 (PDVD)
and ArcSoft Total Media Theater 3 (TMT)
handle the color space issue without any hacking, although we can actually
watch the entire desktop darken as the levels are aligned if playback is
started while in windowed mode.
Picture quality is good in both applications, with
hardware acceleration functioning for MPEG2, H.264 and VC-1 video streams. For the most part both perform well, but PDVD
exhibits some jitter playing back 1080p VC-1 ("The Dark Knight" Blu-ray)
content that was not observed in TMT or with discs containing H.264 content.
|
Application |
CPU Utilization |
|
PDVD : VC-1 |
14%-25% |
|
PDVD : H.264 |
13%-26% |
|
TMT : VC-1 |
10%-20% |
|
TMT : H.264 |
10%-21% |
The 9400M also handles 1080i and 720p MPEG2 ATSC
captures very well. Results are very
consistent between the DXVA2 (hardware accelerated) MPEG2 decoders from
Microsoft, Cyberlink and ArcSoft. This
was not true for software based MPEG2 decoders like AVIVO and MPC-HC, which is
not surprising given the platform’s trade-offs.
This result was consistent across all of the media
types tested. When the GPU was leveraged
video playback was smooth, and even demanding media like 1080i HD PVR captures
were handled without problems. On the
other hand, when the content was not hardware accelerated results were
poor. This includes flash (Hulu) which
worked OK in a window but stuttered horribly in full-screen (thankfully Nvidia
and Adobe are working on a solution for ION users) and VC-1 content contained
in MKV.
Conclusion
Despite some minor flaws, the ASUS AT3N7A-I is a
solid solution for the SFF crowd. Nvidia
does a good job of combining the strengths of the Atom (low power usage) with
those of their IGP (hardware acceleration) to cover the media playback features
missing from the base Atom platform.
Available for $160, it’s very reasonably priced for an ITX solution.
Pro:
- Size
- Low power
-
Good
Blu-ray playback -
8 Channel
LPCM support -
Coaxial
and Optical S/PDIF
Con:
- Loud fan
-
Colorspace
issues with HDMI -
Power LED
blinks in S3
Special thanks to
Nvidia for providing the unit for review.