
VNC: Window To A Remote GUI
If a Windows user wants remote access to another Windows GUI it’s as simple as configuring Windows Remote Desktop and initiating a session. That’s all fine and good, but let’s say the remote GUI is a Linux based PC or perhaps the Windows user wants to use something other than Remote Desktop. How then is this trick to be accomplished? Read on to find out.
History
History
Since the beginning, *nix server users have been connecting remotely to do administration tasks or to simply check their email. For the most part, this was all done via the command line and it was not very user friendly. Then came the GUI explosion. There is no denying the simplicity that the mouse, windows, and icons have brought to the computing world, so it was only natural to desire to have this same functionality remotely. Early on, this need was met by enabling remote X sessions. Unfortunately, settings weren’t universal, and the configuration was complex and problematic, but the demand for remote GUI access only heightened. What was needed was a platform independent means for transferring mouse and keyboard inputs along with screen updates without all the hassles. Enter VNC or Virtual Network Computing.
VNC is a simple protocol that answers many of the needs of the remote GUI user. Both clients and servers are available for all major operating systems, it has rudimentary security in the form of encrypted authentication, it automatically scales the graphics data stream to match the available user bandwidth, and it allows for console GUI and virtual console GUI access.
Windows Server Configuration
Windows Server Configuration
Configuring a Windows VNC server is fairly straight forward. First we need to select a software package which supports our needs and budget. I have used UltraVNC for several years now and I have found it to be robust, stable, feature rich, and not to mention free. As of this writing, the latest stable version is 1.0.2 and can be found here. Download the file and run the setup routine choosing the full installation. During the setup, it will prompt for the user to "Select Additional Tasks". Select "Register UltraVNC Server as a system service" and "Start or restart UltraVNC service" as that will get the server configured and running out right of the gate.
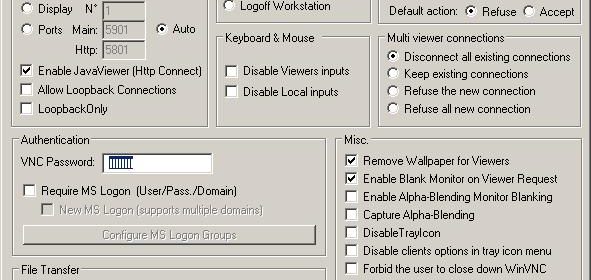
While the files are installing, a somewhat misleading "error" message will pop up warning that no default password has been set. Click "OK" and the setup program will display the server configuration dialog box shown below.
| Windows Server Configuration Dialog |
In the middle left of the dialog, there is a box labeled "Authentication". Type a suitable password in the "VNC Password:" field. VNC has no user names, so this password is the only mechanism by which your GUI is protected from unauthorized access. The upper left box labeled "Incoming Connections" gives the user some options on what type of connections to allow. Typically I only want the console GUI to be available, so I select the "Display" radio button and ensure there is only a "1" in the "N*" field. I also never connect over the web, so I have no need to run the JavaViewer, so I uncheck "Enable JavaViewer". The defaults on the remaining options are usually sufficient for most needs, so click "OK" to close the dialog. Continue through the installation and reboot your PC. Upon reboot, there will be a small blue icon in the system tray showing that the VNC service is running in the background and is waiting for connections.
Linux Server Configuration
Linux Server Configuration
Installing the VNC server on a Linux PC is slightly more complex, but it shouldn’t give most users any difficulty. First, I am making the assumption that we are using either CentOS or Fedora and that the GUI is already running properly. Other distributions will work, but the instructions may need to be modified to suit their needs. First we need to install the VNC server package. As root, run:
yum install vnc-server
If it responds "Nothing to do" then it may mean that you already have the package installed. Once the software is installed, edit the Xorg configuration file like this:
nano -w /etc/X11/xorg.conf
Scroll down to the "Screen" section and insert a few lines:
Option "5900"
Option "rfbauth" "/root/.vnc/passwd"
Option "dontdisconnect"
Option "usevnc"
These select the console GUI to be on port 5900, that the password can be found in a file in the root folder, not to disconnect if a new connection interrupts the existing session, and finally to enable the VNC service.
Scroll to the "Module" section and add the following:
Load "vnc"
This loads the VNC module when Xorg first launches. Now exit the editor by pressing <control>-x, say "y" to approve the changes, and press <enter> to approve the file name. Next, we want to create that file to hold the password. As root, run this:
vncpasswd
This will prompt the user to enter and verify a password. Again, pick something that is difficult to guess. Unfortunately, only the first 8 characters will be used. If this computer will be on a secure network and it is determined that there is no need for passwords, the user can remove this line from xorg.conf:
Option "rfbauth" "/root/.vnc/passwd"
And instead use this:
Option "SecurityTypes" "none"
After a quick reboot, the VNC service should be up and ready for remote connections. Next up, configuring the client and connecting.
Client Configuration
Windows Client Configuration
Fortunately, the client side of the connection requires very little in the way of configuration to get a basic connection established. In the Windows realm, you have two choices. You can either install the complete package as described on the server configuration page, or you can simply download and extract only the UltraVNC Viewer. Either way, launch the client once it is installed and it will present the dialog found below.
 |
| Windows Client Dialog |
There are several knobs to adjust here, but for most purposes simply type in the IP address of the VNC server with which you wish to connect and press the "Connect" button. You will be prompted for a password if that is how the remote server is configured. Once the password is verified, you will be presented with a window displaying the remote GUI.
Linux Client Configuration
In the land of Linux, we need to install the VNC client package. As root, run:
yum install vnc
Again, if you get a response of "Nothing to do" then the package may already be installed. After launching the VNC client from the "Accessories" menu, the user is presented with a simple dialog. Enter the remote VNC server into the "VNC server:" field and click "OK". There are several configuration parameters under the "Options…" dialog, but the defaults should be sufficient. Again, the user will be prompted for a password if the remote VNC server is configured to ask for one. Once the credentials are verified, the user is shown a windowed GUI of the remote server.
 |
| Linux Client Dialog |
Secure That GUI
Secure That GUI
Let’s take the scenario where you have a MythTV box at home and you are at work. Your significant other has called to say that the "MythTV thingy is messed up". You now have 3 options:
- Ignore the problem until you get home.
- Try to walk your significant other through the debug and repair process over the phone.
- Connect remotely via VNC and see/fix the problem first hand.
If the remote VNC server also happens to be running a SSH server, then option #3 becomes a reality. Due to VNC’s somewhat insecure nature, I would never allow direct access to it (firewall or otherwise) from the Internet. However, if you have been following my SSH guide, you know all about SSH tunnels and their advantages. Let’s configure a SSH tunnel to allow GUI access to your home computer from work.
 |
| PuTTY With VNC Tunnel |
First, I’m going to assume that you have read the SSH guide and you already have a working SSH session to your home PC. Launch PuTTY, expand "Connection", and "SSH" in the left tree, and select "Tunnels". Because our VNC sessions use port 5900, enter "5900" in the "Source port" field and "localhost:5900" in the "Destination" field and click "Add". Now, fill in your home’s public IP and port number under the "Session" screen and click "Open". PuTTY should now be showing your remote PC’s command prompt. Launch your VNC client and use "localhost" for the IP. If all went well, PuTTY should tunnel the VNC request to your remote server protecting it from possible prying eyes. If the refresh is too sluggish, try scaling back the color depth in the client to reduce the bandwidth requirements.
Conclusion
Conclusion
Today, we have gained yet another tool in our remote user’s arsenal of tricks. Whether it is used to administer servers across the globe, or a finicky PC across the network, VNC has proven itself to be extremely handy. While we have learned how to deploy this strategy in both Windows and Linux based environments, there are many other options as well including a JAVA based server which can be viewed from a web browser. The configurations are nearly endless. Just remember to keep the security implications in mind before rolling it out on a server with confidential information.
Have a question or comment about a specific configuration? Please feel free to talk about it in our forums by following the link below.