
Build Log – A journey towards all HD all the time (Part I – Tear Down)
Hooray! The last of the parts for my new build arrived last week. I have spent the last several months planning this build. The goal was to upgrade to a machine that ran Blu-ray and recorded in HD with ease, while also building an HTPC that was even quieter than my prior build. Music playback is also imporatant, but that is something that I was already satisfied with in my older HTPC and wouldn’t be much of a change in the new build. I had been waiting on the arrival of my Intel E8500 and it showed up on the doorstep on Thursday night courtesy of UPS. Looked like I wouldn’t be going to work on Friday. My fiancee flew in Friday night, and the goal was to have everything up and running (and the apartment cleaned) prior to her flight arriving. Theoretically we would be enjoying plenty of HD all weekend long.
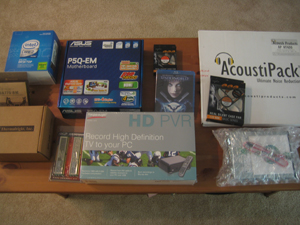
| Yeah! Toys! |
I took advantage of my planned day off to get a little extra sleep and rolled out of bed around 9:30. I was meeting a buddy who is a stay-at-home dad at 10 for some breakfast before we both got rolling on projects for the day. My buddy was going to attempt to repair his broken XBox 360, while I stripped down and rebuilt my Home Theater PC. Breakfast was excellent. I really have become quite the fan of avocado in my omelettes. Mmm…..tasty green fatty berry. Bet you didn’t know that avocado is technically a large berry. At least you learned something from my blog today. Then it was time to get rolling on the build. I’d start by stripping out all of the old components, cleaning the inside of the case, and installing Acoustipak insulation.

|
 |
| Pardon the fuzzy photography. It was a few pictures in before I remembered to turn on "flower" mode. I’d be doing the build in an Accent HT-400 case. I’ve had this since back in 2003 (IIRC) when I first started with home theater computing. This case has served me well every since and I’m glad I put the money into a case I loved up front. It supports a full ATX motherboard and a ATX power supply. Some minor modding was done a little whlle ago to accomadate the power supply being used. Some folks find this size case on the large size, but it’s within a quarter inch of the height of my AVR so I just put them side by side and they look great. | Inside is all sorts of great components that I’d accumlated over the past five years. In this case, I’ll actually be keeping a few of them. The Auzentech X-Meridian is definitely a keeper. As is the Seasonic M12 500W power supply. On the right you can see a Samsung 160GB hard drive. That is actually a stack of two and both of those will stay for now. There’s also a Western Digital Green Power 750GB hiding underneath the DVD drive that will stay. The Zalman Fanmate over on the left is also a keeper. They’re such a great little device for controlling fan speed. Everything else will be boxed away to be used in a WHS build in the spring. |
 |
 |
| First thing’s first. Get all that old stuff out of there and blow some compressed air all over to clean out the dust. You can see how I modded the power supply tray earlier to make room for the Seasonic M12 500. The M12 had an extra 60mm fan that made the PSU longer than standard. Seasonic has since removed it, and their modular power supplies now all would have fit the tray without modification. At the front are cables for usb/firewire/lcd display. |
Here I have laid in the first panel of acoustipak material. This stuff is dense and heavy. I was really surprised by the weight of it. The kit I purchased was pre-cut for this case and QuietPC had a great deal on it. Insulation for top, bottom and two sides for only $25. The insulation is just a little shorter than the motherboard stand-offs. It went on easily on the first try. The pre-cut holes made this easy, since I had something to line everything up to. |
At this point, assistance was needed by my buddy with the XBox repairs, there was a short break to clean the bathroom, and a trip to Quiznos was necessary for prime rib cheesesteak. Coming Soon…Part II – Next We Put in Hardware