
Enable Commercial Skipping on Windows 7…and even CableCard
When the announcement came that ATI would be releasing a new firmware for its cable card devices which would properly support the Copy Freely protections of shows, I got excited. For the past 2 years, I have been a dedicated cable card user within my Vista Media Center to enjoy high definition recordings via Comcast, even though it meant ditching my favorite (and I do mean favorite) plugin, DVRMSToolbox, commonly referred to as DTB. Seeing people who have used the firmware already got me thinking happy thoughts…
You see, DTB is what gave me the magical power to analyze television recordings, find the commercials, and then skip instantly past them when I watched. And with ShowAnalyzer, I was even able to start this process while the recording was still going on! The original firmwares for the ATI tuners however had a copy protection flag on all recordings–whether the broadcaster flagged the show or not–which prevented the ShowAnalyzer from being able to scan the file. According to reports, with this new firmware anything NOT flagged as Copy Protected should be able to be scanned and thus allow me to use DTB and ShowAnalyzer once again!
Since it has been several years since I used the applications and much has changed, I decided to write up a little guide for those of you new to the scene (or maybe you just forgot as I did). With the news that cable card OEM restrictions will soon be dropped, I imagine there will be a lot more of you cable card users out there to take advantage.
Now just as a preface, this new upcoming firmware does NOT mean that ALL of your television recordings will work with this. This will strictly work for recordings which were not flagged as "Copy Protected" by the broadcaster. How can you tell such a thing you may ask?
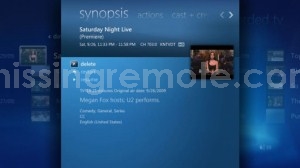
See the screenshots below:
 |
|
| Show with NO COPY PROTECTION, WILL Work | Show WITH Copy Protection that won’t work |
Continue onward for the full guide. I separated it into a few sections to make it easier to follow and keep track of where you are.
Getting Started
Getting Started
First things first, you will need the following programs:
- Latest ATI 1.19 Firmware for cable cards – (Should be available soon according to TheGreenButton , guessing via Windows Update as the last Firmware was)
- DVRMSToolbox 1.2.1.9 (written by MissingRemote’s very own Andy Van Til)
- DTB Addin for Windows7 1.0.0.3
- ShowAnalyzer 1.0
(Note, ShowAnalyzer is a commercial application, but worth every penny.
Also, it’s your only option since the free ComSkip will not work with
WTV files–you can convert your recordings to MPEG and use it, but I’m
going to assume you’d rather just spend the money and help out a great
developer)
While it’s technically feasible to achieve what we’re doing without DTB, I’m going to assume you want to use it as it just makes your
overall life very much easier. Now let’s get onto the fun.
Before you get started, make sure you don’t have any scheduled
recordings upcoming, as the final stage will require a reboot of your
system to get things rolling.
Installation
Installation
DVRMSToolbox
Install the latest version of DTB from the link above (at the time
of this guide, it was 1.2.1.9). Proceed through the following screens:

Leave the "Modify file permissions" selected for most people.

You will want to leave the "Run DVRMSFileWatcher as a service" option
selected–those that want to run the systray app can uncheck the service opiton, but they will need to create a shortcut in the startup folder to the FileWatcher app.

You will see a brief DTBService starting popup…


We will handle configuring DTB in the end, but for now let’s move on with the installs.
ShowAnalyzer 1.0
Once completed, run the installation for ShowAnalyzer 1.0–if the
above download location has not yet updated, you can go to the forum for the latest beta. Another simple install, just follow the dialogs and leave everything checked by default this time:


DTB Addin for Windows 7
The final piece is the DTB Addin for Windows 7. We saved this for last since it will require a reboot of your system.


Configuration
Configuration
10/28 EDIT: Note If you use an EXTENDER check that
"HKEY_LOCAL_MACHINE\SOFTWARE\Microsoft\Windows\CurrentVersion\Media
Center\Service, AlwaysUseFPD(DWORD) = 1".
Setting up
the system for Commercial Skipping can be as simple or complicated as
you desire. There are a number of settings DTB is capable of which we
won’t go into due to their complexity, but the application can do all
sorts of things (like actually cutting the commercials out, and then
encoding into a different format to save space).
In addition to
that, there are two different ways you can choose to monitor your
Recorded TV folder for monitoring programs and thus analyzing for
commercials–ShowAnalyzer or DTB. ShowAnalyzer’s file watcher system is
artifact based, meaning that it will periodically poll the watched
folder for evidence that a file has been processed, and if none found
it will queue up. The advantage to this is that it is minimalistic and produces just the main XML file and that if your system crashes with files waiting to be processed, they will be re-queued the next time SA polls the folder. The downside is that you lose all the good stuff DTB’s PC and profiles get you, is slightly slower than DTB and will generate more unnecessary activity on your hard drive (it polls the contents of the watched folder every X seconds looking for files to process, and then for each video it finds it has to poll for all the artifacts it expects to find as well).
That option is
perfectly acceptable for some, but for the purpose of this guide we are
going to use DTB’s file watcher, which actually listens for file events
(such as create/updated/deleted) for all of its processing options.
It’s fairly foolproof and allows for even further capabilities should
you be so inclined in the future.
Since we will be using DTB’s
File Watcher, the first thing we need to do is disable ShowAnalyzer’s
File Watcher from running, since the two will not play nice if they are
both enabled. Launch the ShowAnalyzer UI option from your start menu.
On the Scheduler tab, uncheck the box for Enable File Watcher as shown
below:

Switch to the "Output" tab and in the "Where" location
add the location of your DVRMSToolbox files (default is
C:\Users\Public\Dvrmstoolbox\). Then change the next 3 sections from "Live" to "Never," and the final VPrj from "Finished" to "Never."

navigate to the "File Watcher" tab. You will want to make the following
changes so that your settings page looks like the below:
- Wait Time (Min) = 0 — This is the time before the application
will begin analyzing a file. If it’s set to 0, it will start
immediately. - Watched Ext — Just ensure that ".wtv" is in the box, it should be.
- Include Watched Folders = checked
- Workers = 1 — 1 is the default, 2 is recommended for most. Anything above 2 is Not recommended unless you use a SSD or faster hard drive.

should begin processing immediately and the application is already
auto-setup to automatically skip your commercials.
DTB options, so feel free to play around. Some tips for new users of
the application:
- If you want to disable Autoskipping of the commercials (since it’s not always perfect) = Press the DOWN arrow on your Remote
- To skip to the next section after commercials (usually I do this
only when a recording started while the end of the show before it was
still going) = Press the RIGHT remote button.
MissingRemote.com! Please do not copy or re-post this anywhere else without expressed written permission. We
appreciate all our visitors and remember to feel free to post any
questions, comments or suggestions in our Forums!